Showing posts with label holiday. Show all posts
Wednesday, July 8, 2015
Starry Nails for the Fourth
I hope everyone had a happy 4th! I didn't have enough time to do any elaborate nail art for the holiday this year but I did manage to do something real quick before I went away for the weekend. For the base color, I used two coats of the Sinful Colors polish named "Cinderella." I wanted a light and cheerful shade of blue and this was just right. I can definitely see where it gets it's name! It really does look like the shade of blue of Cinderella's dress and it's slightly sparkly!
Friday, July 4, 2014
Happy 4th! - Fireworks Nail Art
I hope everyone is having a happy 4th of July! My 4th of July nails were starting to chip so I changed them up and did fireworks nail art. It was a suggestion from my husband and although I did them in a bit of a rush, I think they turned out okay! Sooo...it's time for some fireworks!
I hope everyone has a great weekend! Happy Independence Day!
Friday, June 27, 2014
4th of July- USA Nail Art Tutorial
With the 4th of July coming up next week and with team USA advancing in the World Cup, I thought it was a good time for some patriotic nails. I came up with this simple design and created a tutorial in case you want to try it too!
What You'll Need:
Clear Base Coat
Blue Nail Polish
White Nail Polish
Red Nail Polish
Top Coat
Toothpicks
Step 1. Apply the clear base coat on your nails (I used Seche Clear base coat).
Step 2. Once the clear coat is dry, pick a blue polish you like and paint your nails that color. I used a pretty sparkly blue polish by Sinful Colors called "Blue By You."
Step 3. After the blue polish has dried, grab your white polish and a toothpick and paint a star on one of your fingers. I chose the ring finger but you can choose a different one if you prefer- or you could even paint stars on all of them if you like! Here's a graphic I made on how to freehand paint a star onto your nail.
Step 4. Once your star is done and has dried, grab your red polish and a new toothpick and add red stripes next to the star.
Step 5. After the red polish has dried, add your top coat (I used Seche Vite dry fast top coat) and you are done!
This nail art could also be Captain America inspired nails since they match him too! My husband pointed that out when he saw them. :)
I hope this tutorial is helpful. Let me know if you try it out!
What You'll Need:
Clear Base Coat
Blue Nail Polish
White Nail Polish
Red Nail Polish
Top Coat
Toothpicks
Step 1. Apply the clear base coat on your nails (I used Seche Clear base coat).
Step 2. Once the clear coat is dry, pick a blue polish you like and paint your nails that color. I used a pretty sparkly blue polish by Sinful Colors called "Blue By You."
Step 3. After the blue polish has dried, grab your white polish and a toothpick and paint a star on one of your fingers. I chose the ring finger but you can choose a different one if you prefer- or you could even paint stars on all of them if you like! Here's a graphic I made on how to freehand paint a star onto your nail.
Step 4. Once your star is done and has dried, grab your red polish and a new toothpick and add red stripes next to the star.
Step 5. After the red polish has dried, add your top coat (I used Seche Vite dry fast top coat) and you are done!
This nail art could also be Captain America inspired nails since they match him too! My husband pointed that out when he saw them. :)
I hope this tutorial is helpful. Let me know if you try it out!
Wednesday, April 16, 2014
Colorful Easter Nails
Today I'm sharing my Easter nail art that I currently have on my nails right now!

For my Easter nails, I knew I wanted something colorful so I started out by going through my polishes and picking out bright and happy colors. These are the polishes I ended up using as the base colors:
Nicole by OPI (Selena Gomez collection) "Love Song"
Sally Hansen Xtreme Wear "Mellow Yellow"
Sally Hansen Xtreme Wear "Blizzard Blue"
Sally Hansen Xtreme Wear "Green with Envy"
Sinful Colors "Pink Forever"
Kiss Nail Artist Kit (I used a couple polishes from this kit for the stripes and chevron lines)
I painted each of my nails a different color and then thought about what I wanted on each nail. I wanted some of my nails to look like Easter eggs but I wanted to add a bunny in there too so I chose my ring finger to paint bunny ears. On my thumbnail, I painted some flowers. To paint each design, I I stuck to colors that were on the other nails to try to make it all look more cohesive. I was pleased with how it came out and the result was definitely as colorful and happy as I'd been hoping for!
I did the same thing on my right hand except on my thumbnail, I painted clouds instead of flowers.
If you want to do similar Easter nail art, go for it! You could even just stick to a simple mani using spring colors if you don't have time to paint on the designs. I almost left my nails that way since spring colors looks so great on their own! I don't think I'll be painting any Easter eggs this year though so I thought painting designs on my nails were a fun way to make up for it.
Have a happy Easter everyone and happy Spring!
P.S. I know I promised one more Frozen inspired mani but my schedule got too busy so I'm saving it for later since Easter is coming up fast! It'll hopefully be one of the next ones I share! :)
Wednesday, February 12, 2014
It's a Small World- Hearts Nail Art
I have some more hearts nail art to share with you all today! If the
pattern looks a bit familiar it's because it was inspired by what you could call a very obscure Disney character. Can you guess who?
If you guessed the jaguar in the ride It's a Small World then you got it (and I'm really impressed because I don't think I would have even guessed it)!
On "it's a small world", you ride through many different countries including a rainforest in Brazil. The rainforest section is my husband's favorite part of the ride and I still remember how sad we were when there were rumors that they were going to get rid of it when they did the refurbishment in 2008. Luckily it's still there although it seems a bit smaller. It was around that time that we ended up decorating one of our bathrooms with a It's a Small World RAINFOREST theme. So when we saw they had the stuffed animal jaguar from it for sale at the Disney Store, we decided to add it to our collection.
I really love his heart-shaped spots and when I was trying to think of some Valentine hearts to paint on my nails- he came to mind!
I like how it turned out especially since the bright yellow is so cheerful. I got several compliments on them and my hubby even wanted me to start carrying the jaguar around so people could see where the pattern came from! I didn't carry him around (he a little too big for my purse) but I got some pictures with a friend of his at Disney California Adventure on the day I was wearing yellow and purple to match.
What do you think of my Small World jaguar nails? Do you remember the jaguar from the ride?
I hope you all enjoyed today's nail art and in case I don't have time to post again before the weekend- Happy Valentine's Day!
If you are interested in getting your own It's a Small World stuffed animal, they currently still have some for sale on the Disney Store website!
http://www.disneystore.com/it-
Monday, December 30, 2013
Doctor Who- 11th Doctor Holiday Nails- Bow Ties!
On the evening of Christmas day, much of my family gathered around the television to watch the Christmas special of Doctor Who. We did this last year as well and it seems that it might be a new tradition for us!
Once again I painted my nails to go with the Doctor Who episode! Since it is the holidays and we were going to be watching Matt Smith's last episode, I painted red and green bow ties and a fez on my nails. Bow ties are cool and a fezzes are too!
We like Matt Smith so we were all eager to watch the episode but also not so eager since we think he's awesome and didn't want to say good-bye. For Christmas, I received a stuffed animal version of Matt Smith as the Doctor so he watched the episode with us.
I'm sad to say that the episode was far from our favorite and we were a bit disappointed. We still had a great time watching it together though and I'm curious to see Peter Capaldi's episodes in the future. Matt Smith was great so he has big shoes (or a big fez) to fill!
Once again I painted my nails to go with the Doctor Who episode! Since it is the holidays and we were going to be watching Matt Smith's last episode, I painted red and green bow ties and a fez on my nails. Bow ties are cool and a fezzes are too!
We like Matt Smith so we were all eager to watch the episode but also not so eager since we think he's awesome and didn't want to say good-bye. For Christmas, I received a stuffed animal version of Matt Smith as the Doctor so he watched the episode with us.
I'm sad to say that the episode was far from our favorite and we were a bit disappointed. We still had a great time watching it together though and I'm curious to see Peter Capaldi's episodes in the future. Matt Smith was great so he has big shoes (or a big fez) to fill!
Monday, December 23, 2013
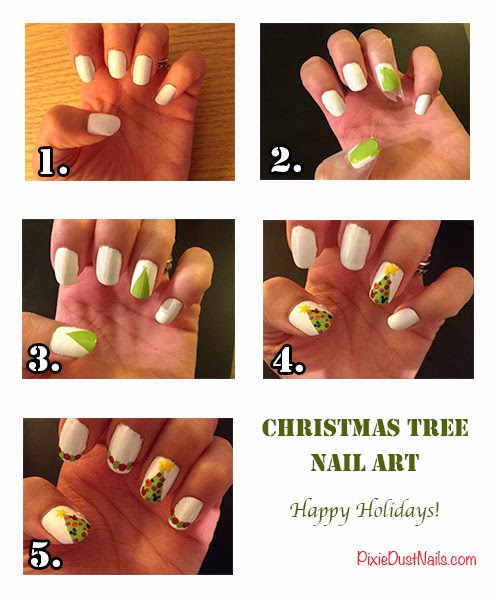
Tutorial- Christmas Tree Nail Art with Hidden Mickeys
Happy Holidays from Pixie Dust Nails! I love painting Christmas trees onto my nails because it's pretty easy to do. Here's a tutorial in case you want to do some Christmas nail art too!
What you'll need:
- Nail polish to paint the background of your nail art (I used white)
- Various colors of nail polish for your Christmas Tree
- Tape (I used Scotch tape)
- Bobby pin or dotting tool
- Toothpicks
Step 1. Pick a color you want the background of your nail art to be. I picked white so that my trees would stand out on it. Paint your nails in that color.
Step 2. After the polish is completely dry, get two pieces of masking tape and place them onto your nail so that it creates a stencil of your triangle for your Christmas tree. Then paint the inside with the color you want your tree to be- I used lime green! The tape will prevent excess paint from getting onto the rest of your nail. Do this on as many nails as you want. I painted trees onto my ring finger and my thumb.
Step 3. After you paint in the shapes for the trees, let the paint dry and carefully remove the tape.
Step 4. Now you have the shapes for your trees! It's time for the fun part - decorating them! You can use a dotting tool or the end of a bobby pin to paint on dots for your ornaments. You can use whatever colors you like. Using a toothpick, I painted on ears to some of my ornaments to make hidden Mickeys. I used another toothpick to paint a star on the top.
Step 5. For the nails you don't paint trees on, you can use your dotting tool or bobby pin to paint on garland. In the end, you have some festive nails!
And that's how you can do some Christmas nail art for the holidays! I hope everyone has a merry and magical time with family and loved ones!
What you'll need:
- Nail polish to paint the background of your nail art (I used white)
- Various colors of nail polish for your Christmas Tree
- Tape (I used Scotch tape)
- Bobby pin or dotting tool
- Toothpicks
Step 1. Pick a color you want the background of your nail art to be. I picked white so that my trees would stand out on it. Paint your nails in that color.
Step 2. After the polish is completely dry, get two pieces of masking tape and place them onto your nail so that it creates a stencil of your triangle for your Christmas tree. Then paint the inside with the color you want your tree to be- I used lime green! The tape will prevent excess paint from getting onto the rest of your nail. Do this on as many nails as you want. I painted trees onto my ring finger and my thumb.
Step 3. After you paint in the shapes for the trees, let the paint dry and carefully remove the tape.
Step 4. Now you have the shapes for your trees! It's time for the fun part - decorating them! You can use a dotting tool or the end of a bobby pin to paint on dots for your ornaments. You can use whatever colors you like. Using a toothpick, I painted on ears to some of my ornaments to make hidden Mickeys. I used another toothpick to paint a star on the top.
Step 5. For the nails you don't paint trees on, you can use your dotting tool or bobby pin to paint on garland. In the end, you have some festive nails!
And that's how you can do some Christmas nail art for the holidays! I hope everyone has a merry and magical time with family and loved ones!
Wednesday, July 17, 2013
Bastille Day- France Nail Art
I of course had to do some France inspired nail art for the occasion! Last year I painted my nails to look like France's flag. This year I wanted to do something different but with the same colors. Here is what I came up with:
I am so happy with how these turned out! I knew I wanted some stripes in there so on my index finger and pinkie I used a L'oreal blue polish called "Jet Set to Paris" (perfect name!). Then I painted on the white stripes.
On the middle finger I used a Maybelline red polish called "Speedy Hot Tamale" and then I painted on white hearts using a dotting tool. On my ring finger I tried to paint the shape of the Eiffel Tower. I used a thin brush and a tooth pick to paint it on there.
Finally on my thumb I painted some roses! I've always wanted to paint roses like this on my nails but could never figure out how to get the design right. I found this tutorial on a blog called "Follow That Way". Here is the link to it: Follow That Way: Rose Nail Art Tutorial. The tutorial helped a lot and I was finally able to accomplish these roses using a small dotting tool! I skipped the leaves because I wanted to stick to mostly just the red, white, and blue colors and the shape of the rose seemed fine on it's own. Here are my roses with my Disney French children's book that I found at the French boutique! I think Belle would be a fan of the roses, don't you? ;)
We had a very nice Bastille day and my nails really fit in with everything! I found some great ideas on Pinterest that I was able to use for decor! Here are some photos from our day!
![]() |
| The little French boutique we visited the day before! |
![]() |
| French snacks and champagne! |
![]() | |
| Found templates for this bunting on Pinterest. It came from the blog Creature Comforts |
![]() |
| Hubby made Croque Monsieur- YUM! |
It was a great day! I had a lot of fun coming up with a new manicure for it. What do you think of my France nail art?
Subscribe to:
Posts (Atom)