Showing posts with label tutorial. Show all posts
Thursday, July 16, 2015
Disneyland 60 Diamond Celebration Nail Art Tutorial
This year marks Disneyland's 60th anniversary! The actual birthday is July 17 but Disneyland started the party in May with it's big Diamond Celebration. To commemorate it's big 60th, I'm sharing a tutorial on how to do some diamond nail art fit for the occasion. It's actually really simple to do and you don't need many supplies for it. Here it is!
Friday, June 27, 2014
4th of July- USA Nail Art Tutorial
With the 4th of July coming up next week and with team USA advancing in the World Cup, I thought it was a good time for some patriotic nails. I came up with this simple design and created a tutorial in case you want to try it too!
What You'll Need:
Clear Base Coat
Blue Nail Polish
White Nail Polish
Red Nail Polish
Top Coat
Toothpicks
Step 1. Apply the clear base coat on your nails (I used Seche Clear base coat).
Step 2. Once the clear coat is dry, pick a blue polish you like and paint your nails that color. I used a pretty sparkly blue polish by Sinful Colors called "Blue By You."
Step 3. After the blue polish has dried, grab your white polish and a toothpick and paint a star on one of your fingers. I chose the ring finger but you can choose a different one if you prefer- or you could even paint stars on all of them if you like! Here's a graphic I made on how to freehand paint a star onto your nail.
Step 4. Once your star is done and has dried, grab your red polish and a new toothpick and add red stripes next to the star.
Step 5. After the red polish has dried, add your top coat (I used Seche Vite dry fast top coat) and you are done!
This nail art could also be Captain America inspired nails since they match him too! My husband pointed that out when he saw them. :)
I hope this tutorial is helpful. Let me know if you try it out!
What You'll Need:
Clear Base Coat
Blue Nail Polish
White Nail Polish
Red Nail Polish
Top Coat
Toothpicks
Step 1. Apply the clear base coat on your nails (I used Seche Clear base coat).
Step 2. Once the clear coat is dry, pick a blue polish you like and paint your nails that color. I used a pretty sparkly blue polish by Sinful Colors called "Blue By You."
Step 3. After the blue polish has dried, grab your white polish and a toothpick and paint a star on one of your fingers. I chose the ring finger but you can choose a different one if you prefer- or you could even paint stars on all of them if you like! Here's a graphic I made on how to freehand paint a star onto your nail.
Step 4. Once your star is done and has dried, grab your red polish and a new toothpick and add red stripes next to the star.
Step 5. After the red polish has dried, add your top coat (I used Seche Vite dry fast top coat) and you are done!
This nail art could also be Captain America inspired nails since they match him too! My husband pointed that out when he saw them. :)
I hope this tutorial is helpful. Let me know if you try it out!
Tuesday, January 14, 2014
Tinkerbell Nail Art
The Tinkerbell Half Marathon weekend at Disneyland is coming up so I am sharing a tutorial on how to paint Tinkerbell inspired nails! Whether you are doing the half, 10k, 5k or cheering people on, these nails are the perfect way to fit in to the fairy theme!
To start off, paint your nails a color of your choosing. For my nails, I went with what I imagine is Tinkerbell's favorite color- green! I used Sally Hansen "Green With Envy."
After I let the polish dry completely, I used a toothpick to paint Tinkerbell's silhouette onto my ring finger. Tinkerbell is a little tricky to do but I tried to put together a guide in the image below:
If Tinkerbell seems a little too complicated or if you are short on time, you can also do a simpler mani that is pixie dust inspired!
I hope you all enjoyed this nail art tutorial! If any of you are doing some of the Tinkerbell runDisney events this weekend, I wish you luck and hope you have lots of fun! Remember: “The moment you doubt whether you can fly, you cease for ever to be able to do it.” ― J.M. Barrie. Always believe in yourself and don't give up! Have a great week everyone!
To start off, paint your nails a color of your choosing. For my nails, I went with what I imagine is Tinkerbell's favorite color- green! I used Sally Hansen "Green With Envy."
After I let the polish dry completely, I used a toothpick to paint Tinkerbell's silhouette onto my ring finger. Tinkerbell is a little tricky to do but I tried to put together a guide in the image below:
Because it's a silhouette it doesn't have to be perfect. If you have nail tools, you can use those to paint her but I found that the toothpick worked well for me! After I painted on Tink, I added pixie dust using gold glittery polish! I used a thin polish brush to do this but you could probably use a toothpick as well or a normal polish brush if you apply it carefully. At the end you have pretty fairy-like nails!
If Tinkerbell seems a little too complicated or if you are short on time, you can also do a simpler mani that is pixie dust inspired!
To do this just paint your nails whichever color you choose and then after it dries, add some gold or silver glitter polish. I love glittery polish- it always reminds me of pixie dust! This mani would be a great match for a Tinkerbell or other fairy inspired look!
I hope you all enjoyed this nail art tutorial! If any of you are doing some of the Tinkerbell runDisney events this weekend, I wish you luck and hope you have lots of fun! Remember: “The moment you doubt whether you can fly, you cease for ever to be able to do it.” ― J.M. Barrie. Always believe in yourself and don't give up! Have a great week everyone!
Monday, December 23, 2013
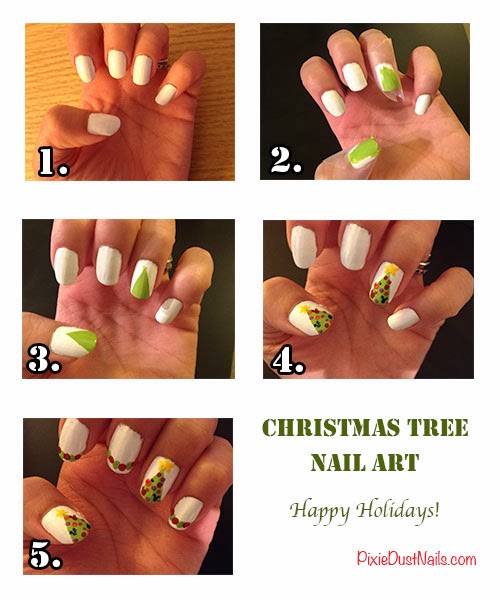
Tutorial- Christmas Tree Nail Art with Hidden Mickeys
Happy Holidays from Pixie Dust Nails! I love painting Christmas trees onto my nails because it's pretty easy to do. Here's a tutorial in case you want to do some Christmas nail art too!
What you'll need:
- Nail polish to paint the background of your nail art (I used white)
- Various colors of nail polish for your Christmas Tree
- Tape (I used Scotch tape)
- Bobby pin or dotting tool
- Toothpicks
Step 1. Pick a color you want the background of your nail art to be. I picked white so that my trees would stand out on it. Paint your nails in that color.
Step 2. After the polish is completely dry, get two pieces of masking tape and place them onto your nail so that it creates a stencil of your triangle for your Christmas tree. Then paint the inside with the color you want your tree to be- I used lime green! The tape will prevent excess paint from getting onto the rest of your nail. Do this on as many nails as you want. I painted trees onto my ring finger and my thumb.
Step 3. After you paint in the shapes for the trees, let the paint dry and carefully remove the tape.
Step 4. Now you have the shapes for your trees! It's time for the fun part - decorating them! You can use a dotting tool or the end of a bobby pin to paint on dots for your ornaments. You can use whatever colors you like. Using a toothpick, I painted on ears to some of my ornaments to make hidden Mickeys. I used another toothpick to paint a star on the top.
Step 5. For the nails you don't paint trees on, you can use your dotting tool or bobby pin to paint on garland. In the end, you have some festive nails!
And that's how you can do some Christmas nail art for the holidays! I hope everyone has a merry and magical time with family and loved ones!
What you'll need:
- Nail polish to paint the background of your nail art (I used white)
- Various colors of nail polish for your Christmas Tree
- Tape (I used Scotch tape)
- Bobby pin or dotting tool
- Toothpicks
Step 1. Pick a color you want the background of your nail art to be. I picked white so that my trees would stand out on it. Paint your nails in that color.
Step 2. After the polish is completely dry, get two pieces of masking tape and place them onto your nail so that it creates a stencil of your triangle for your Christmas tree. Then paint the inside with the color you want your tree to be- I used lime green! The tape will prevent excess paint from getting onto the rest of your nail. Do this on as many nails as you want. I painted trees onto my ring finger and my thumb.
Step 3. After you paint in the shapes for the trees, let the paint dry and carefully remove the tape.
Step 4. Now you have the shapes for your trees! It's time for the fun part - decorating them! You can use a dotting tool or the end of a bobby pin to paint on dots for your ornaments. You can use whatever colors you like. Using a toothpick, I painted on ears to some of my ornaments to make hidden Mickeys. I used another toothpick to paint a star on the top.
Step 5. For the nails you don't paint trees on, you can use your dotting tool or bobby pin to paint on garland. In the end, you have some festive nails!
And that's how you can do some Christmas nail art for the holidays! I hope everyone has a merry and magical time with family and loved ones!
Thursday, November 21, 2013
DIY TARDIS Dress
As promised in my Doctor Who: TARDIS and Galaxy Nails post, here is how I made my TARDIS dress!
It took a bit of trial and error but in the end this is what I used:
- Affordable blue dress (I found mine at Ross)
- Blue and White Felt (can use fabric too but I found that the felt worked better for me)
- Black Ribbon
- Wite-Out or white fabric marker
- White Cardstock
- Printer
- Scissors
- Fabric Glue
- Safety Pins
How To:
1. First, I looked over my dress and I did some brainstorming as to what I wanted it to look like. The most recognizable features of the TARDIS in my opinion are the windows, the St. John Ambulance logo, and the notice so I planned to add those to the dress.
2. I cut out some scratch paper into the shapes of those TARDIS features (2 rectangles for the windows, a circle for the logo, and a large rectangle for the notice) and then I figured out where everything would be placed. This helped because it gave me an idea on what size everything needed to be and what I wanted for the overall look. After this, I started working on creating the windows.
3. For the windows, I cut out two rectangles out of the blue felt/fabric and then cut out 12 smaller white rectangles out of the cardstock and glued them onto the blue ones. I placed 6 of the white rectangles onto each blue one (2 rows of 3 on each).
4. For the St. John Ambulance logo and the notice, I found images of them online and printed them onto cardstock. Afterwards, I glued the cardstock onto white felt. (This was to make it so they were more stiff and wouldn't tear as easily when they were on the dress.)
5. I cut a piece of black ribbon and then wrote "Police Public Call Box" on it using white-out (you can also use a white fabric marker). To be honest, this took me a couple tries to get it to look the way I wanted it.
6. After giving the glue and Wite-Out 24 hours to completely dry, I placed everything on the dress and then started safety pinning it on. It took a little patience but in the end I got everything on there! If you have sewing skills, you could also sew everything onto the dress but I do like that with the safety pins I can remove all the pieces when I wash the dress and then I can just pin everything back on afterwards!
At the last minute, I decided that the TARDIS dress wasn't complete without the light on top so I used a plastic headband and white and blue sparkly pom poms to create one. I used a hot glue gun to glue them onto the headband and then I was done! Sometime I might make a more elaborate light headpiece but it works for now!
So that's how I made my TARDIS outfit! I recommend buying some extra materials to allow yourself to play with ideas on how you want to design your dress! I'm looking forward to wearing my dress again this weekend! Just a couple more days until the Doctor Who 50th Anniversary special!
Subscribe to:
Posts (Atom)